
Building Dynamic UIs in Laravel Without Vue or React? Meet Livewire

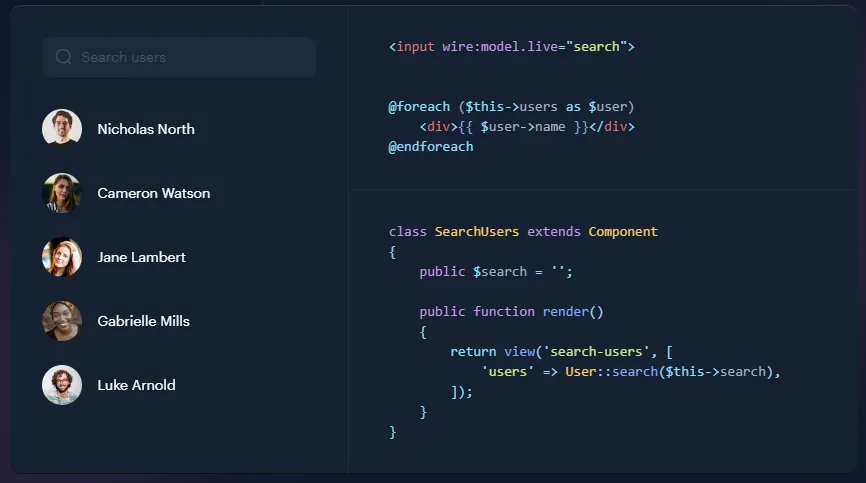
Hey everyone! So, today, I want to tell you about Livewire, which is a really awesome tool for building web applications with Laravel. Imagine being able to create cool, dynamic websites without having to dive deep into complex JavaScript frameworks like Vue or React. That’s what Livewire does! It lets you build interactive apps right from Laravel
using just PHP, which is super convenient. It handles things like updating pages and binding data automatically, so you can focus on adding cool features instead.
In this article, I’ll take you through a step-by-step guide on how to create a CRUD (Create, Read, Update, Delete) application in Laravel 10 using Livewire 3. It’s a great way to make your web development easier and faster, whether you’re just starting out or already have some experience. I hope you enjoy reading my article!
Prerequisites
Before we start, make sure you have the following installed:
- Laravel version 10 or later
- PHP version 8.1 or later
Before creating your first Laravel project, make sure that your local machine has PHP and Composer installed
Creating a Laravel Project
After you have installed PHP and Composer, you may create a new Laravel project via Composer’s create-project command:
composer create-project laravel/laravel:^10.0 <your-project-name>
Or, you may create new Laravel projects by globally installing the Laravel installer via Composer:
composer global require laravel/installer
laravel new <your-project-name>
Once the project has been created, start Laravel’s local development server using Laravel Artisan’s serve command:
cd example-app
php artisan serve
Once you have started the Artisan development server, your application will be accessible in your web browser at http://localhost:8000.
Configure Database Details
After, Installation Go to the project root directory, open .env file, and set database detail as follows:
DB_CONNECTION=mysql
DB_HOST=127.0.0.1
DB_PORT=3306
DB_DATABASE=<DATABASE NAME>
DB_USERNAME=<DATABASE USERNAME>
DB_PASSWORD=<DATABASE PASSWORD>
Install Livewire
From the root directory of your Laravel app, run the following Composer command:
composer require livewire/livewire
Components
Let’s see how we can create a livewire component.
A handy Artisan command for rapidly creating new components is offered by Livewire. The command to create a new TodoList component is as follows:
php artisan make:livewire TodoList
This command will generate two new files in your project:
- app/Livewire/Todo.php
- resources/views/livewire/todo-list.blade.php
A single root element is required for all livewire components. Livewire requires that each component have a single element as its root in order to function. An exception is raised if more than one root element is found.
<div>
  @if (session('error'))
  <div
    class="rounded-b border-t-4 border-red-500 bg-red-100 px-4 py-3 text-red-900 shadow-md"
    role="alert"
  >
    <div class="flex">
      <div class="py-1">
        <svg
          class="mr-4 h-6 w-6 fill-current text-red-500"
          xmlns="http://www.w3.org/2000/svg"
          viewBox="0 0 20 20"
        >
          <path
            d="M2.93 17.07A10 10 0 1 1 17.07 2.93 10 10 0 0 1 2.93 17.07zm12.73-1.41A8 8 0 1 0 4.34 4.34a8 8 0 0 0 11.32 11.32zM9 11V9h2v6H9v-4zm0-6h2v2H9V5z"
          />
        </svg>
      </div>
      <div>
        <p class="font-bold">Error</p>
        <p class="text-sm">{{ session('error') }}</p>
      </div>
    </div>
  </div>
  @endif @include('livewire.includes.create-todo-box')
  @include('livewire.includes.search-box')

  <div id="todos-list">
    @foreach ($todos as $todo) @include('livewire.includes.todo-card')
    @endforeach
    <div class="my-2">{{ $todos->links() }}</div>
  </div>
</div>
Properties
Data is managed and stored within your Livewire components using properties. They may be accessed and changed on the client-side as well as the server-side and are declared as public properties on component classes.
Setting up properties
The mount() function of your component allows you to set initial values for properties.
Take a look at this example:
<?php

namespace App\Livewire;

use Illuminate\Support\Facades\Auth;
use Livewire\Component;

class TodoList extends Component
{
    public $todos = [];

    public $todo = '';

    public function mount()
    {
        $this->todos = Auth::user()->todos;
    }

    // ...
}
Lifecycle hooks
Livewire has a number of lifecycle hooks that allow you to run code at certain stages of a component’s lifetime. These hooks let you conduct activities before or after specific events, including component initialization, property updates, and template rendering.
Here is a list of all the accessible component lifecycle hooks.
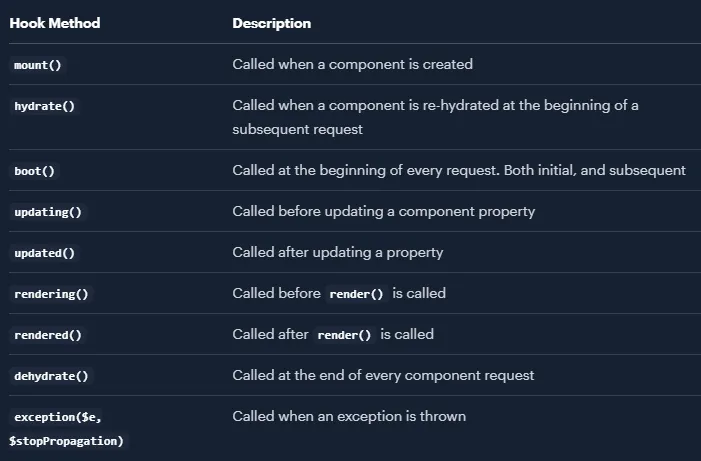
You can use dependency injection with all hook methods
Livewire allows you to resolve dependencies out of Laravel’s service container by type-hinting method parameters on lifecycle hooks.
In conclusion, Livewire offers an incredible way to build dynamic, interactive UIs in Laravel without needing to master JavaScript frameworks like Vue or React. By leveraging Livewire, you can keep everything within the familiar PHP and Laravel ecosystem, which makes development faster and easier. Whether you’re building a simple to-do list or a more complex application, Livewire’s components, properties, and lifecycle hooks give you the flexibility and control to create powerful features effortlessly.
To help you get started, I’ve uploaded a full example of a Livewire to-do app to GitHub. In this repository, you’ll find all the classes, blade files, and other code examples from this tutorial. Feel free to check it out and explore the concepts in more detail: Livewire Todo App GitHub Repository. I hope this tutorial has been helpful, and I can’t wait to see what you create with Livewire!
Follow me on GitHub: MadhushaPrasad