
Micro-Frontend Architecture: Setup & Key Concepts.

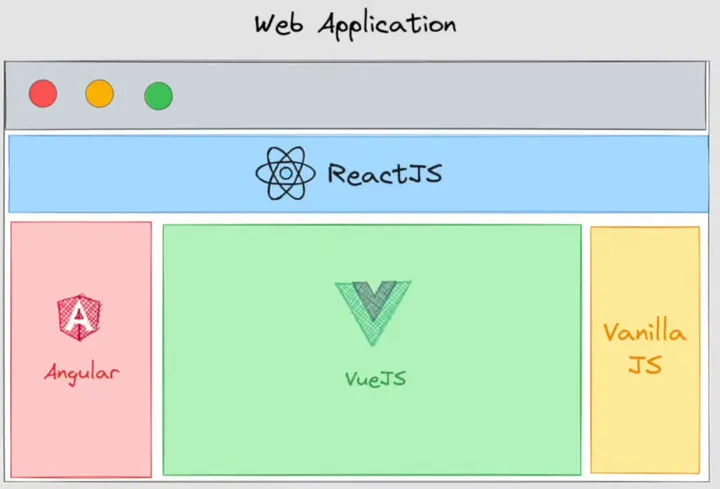
Micro-frontends extend the microservices approach to the frontend world, allowing large teams to work independently on different features of a web application. This modular approach helps organizations scale their development process, improve code maintainability, and enable technology diversity across teams.
What is Micro-Frontend Architecture?
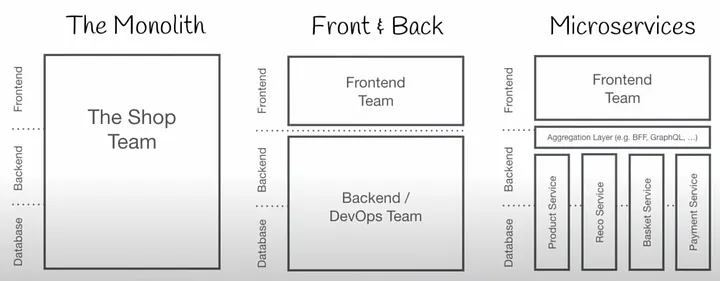
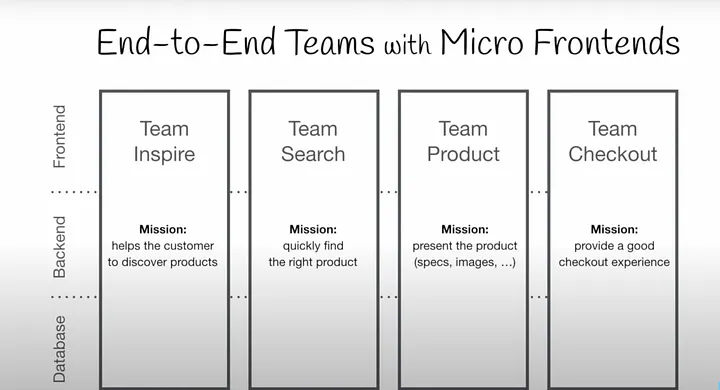
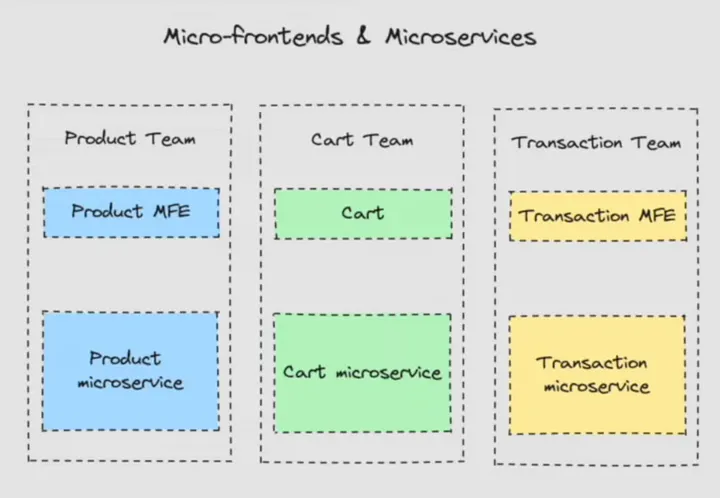
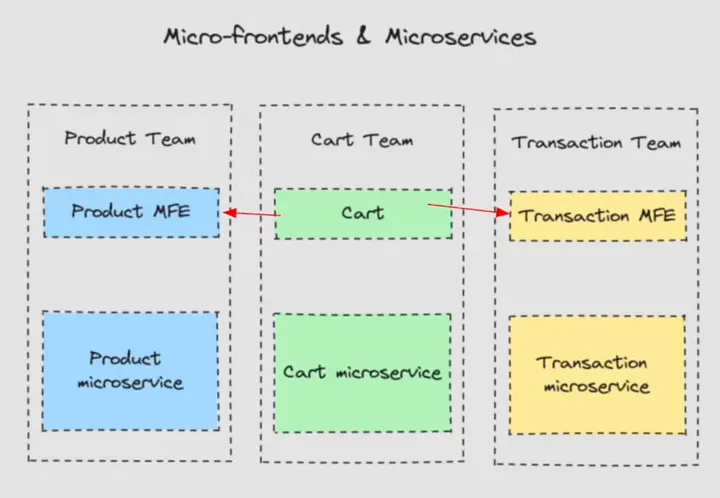
Micro-frontend architecture is essentially the concept of breaking up a monolithic frontend into smaller, manageable pieces, each owned by different teams. Instead of a single codebase for the entire frontend, each team develops, deploys, and maintains its own “micro-frontend” focused on a specific feature or domain (such as product display, checkout, or recommendations). These micro-frontends are then composed together in the browser, much like how backend microservices are orchestrated. This approach enables each team to own its codebase and responsibility, promoting autonomy and faster development cycles.
Advantages of Using MFE?
- Scalability & Reusability: Applications can be divided into multiple domains, allowing teams to scale independently and reuse components across projects.
- Reliability: If one micro-frontend fails, it doesn’t bring down the entire application. Each micro-frontend can have its own CI/CD pipeline, testing, and deployment process.
- Technology Flexibility: Teams can use different frameworks or languages for their micro-frontends, as long as they support the integration requirements.
- Autonomous Deployment: Each micro-frontend can be deployed independently, reducing bottlenecks and making rollbacks or updates safer and faster.
Disadvantages of Using MFE?
- Complexity & Coupling: Managing multiple repositories, pipelines, and deployments can increase the overall complexity of the project.

- Increased Cost: More infrastructure, more pipelines, and more repositories can drive up both development and operational costs.

- Potential for Excessive Coupling: If not managed carefully, dependencies between micro-frontends can become tangled, making maintenance more difficult.
- Overkill for Simple Apps: For smaller or less complex applications, micro-frontends may add unnecessary overhead.
Setting Up Two Micro-Frontend Apps
Here’s a step-by-step guide to setting up two micro-frontend applications.
Create the Main Directory
mkdir micro-frontend-project
cd micro-frontend-project
Create two separate Vite projects:
- Products (Remote App) → Micro-frontend exposing a component.
- Host (Main App) → Application consuming the remote component.
Setting Up the Remote Products Feature
Step 1: Create the Products Project
npm create vite@latest
- Enter project name:
products - Select
React - Select
TypeScript
Step 2: Install Module Federation Plugin
cd products
npm install @module-federation/vite
Step 3: Implement Product List Feature
- Create Product List Page
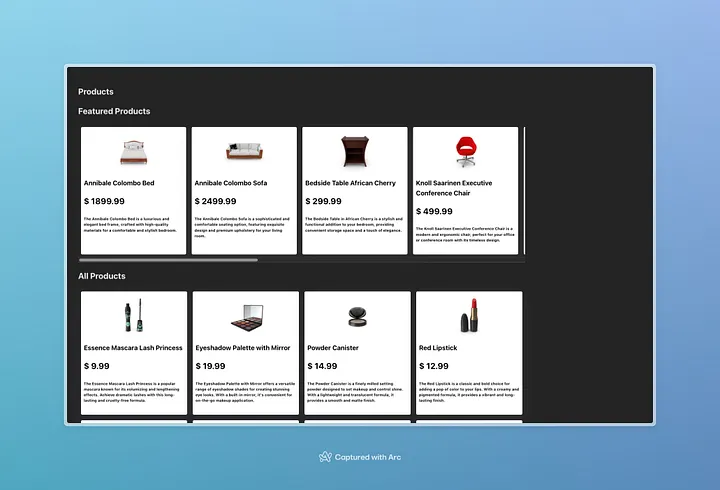
Create src/pages/ProductsList/ProductsList.tsx to display featured and all products.
import { useEffect, useState } from "react";
import { ProductListItem } from "../../components/ProductListItem/ProductListItem";
import type { IProduct } from "../../interfaces/IProduct";
import "./ProductsList.css";
import FeaturedProductsList from "../../components/FeaturedProductsList/FeaturedProductsList";

export const ProductList = () => {
 const [products, setProducts] = useState<IProduct[]>([]);

 useEffect(() => {
   fetchProducts();
 }, []);

 const fetchProducts = async () => {
   try {
     const productsResponse = await fetch("https://dummyjson.com/products");
     const productsResponseJson = await productsResponse.json();
     setProducts(productsResponseJson.products);
   } catch (error) {
     console.log("error", error);
   }
 };

 return (
   <div className="product-list-container">
     <h2>Products</h2>
     <FeaturedProductsList></FeaturedProductsList>
     <h2 className="heading">All Products</h2>
     <div className="products-list">
       {products.map((item) => (
         <ProductListItem product={item}></ProductListItem>
       ))}
     </div>
   </div>
 );
};
Here, we are using a dummy API for the product list.
- Create Product List CSS:
Create src/pages/ProductsList/ProductsList.css
.products-list {
  display: grid;
  grid-template-columns: repeat(auto-fit, minmax(300px, 1fr));
  grid-auto-rows: minmax(250px, auto);
}
.product-list-container {
  height: 100vh;
  width: 100%;
  text-align: flex-start;
}
- Create Product Interface:
Create src/interfaces/IProduct.ts
export interface IProduct {
  title: string
  description: string
  price: string
  images: string[]
}
- Create Product Card Component:
Create src/components/ProductListItem/ProductListItem.tsx
import type { IProduct } from "../../interfaces/IProduct";
import "./ProductListItem.css";

interface ProductListItemProps {
 product: IProduct;
}

export const ProductListItem = (props: ProductListItemProps) => {
 const { product } = props;
 return (
   <div className="product-card">
     <div className="product-image-container">
       <img src={product.images[0]} className="product-image"></img>
     </div>
     <h3>{product.title}</h3>
     <h2>{`$ ${product.price}`}</h2>
     <h6>{product.description}</h6>
   </div>
 );
};
- Create Product Card CSS file:
Create src/components/ProductListItem/ProductListItem.css
.product-image {
  width: 120px;
  height: 120px;
}
.product-card {
  background-color: white;
  border-radius: 4px;
  box-shadow: rgba(100, 100, 111, 0.2) 0px 7px 29px 0px;
  padding: 8px;
  margin: 8px;
  min-width: 285px;
}
.product-image-container {
  display: flex;
  justify-content: center;
}
- Create Featured Product List Component:
Create src/components/FeaturedProductsList/FeaturedProductsList.tsx
import { useEffect, useState } from "react";
import type { IProduct } from "../../interfaces/IProduct";
import { ProductListItem } from "../ProductListItem/ProductListItem";
import "./FeaturedProductsList.css";

const FeaturedProductsList = () => {
 const [featuredProducts, setFeaturedProducts] = useState<IProduct[]>([]);

 useEffect(() => {
   fetchProducts();
 }, []);

 const fetchProducts = async () => {
   try {
     const productsResponse = await fetch('https://dummyjson.com/products?limit=10&skip=10&select=title,price,images,description');
     const productsResponseJson = await productsResponse.json();
     setFeaturedProducts(productsResponseJson.products);
   } catch (error) {
     console.log("error", error);
   }
 };

 return (
   <div>
     <h2 className="heading">Featured Products</h2>
     <div className="featured-product-list">
       {featuredProducts.map((item) => (
         <ProductListItem product={item}></ProductListItem>
       ))}
     </div>
   </div>
 );
};

export default FeaturedProductsList;
- Create Featured Product List CSS file:
Create src/components/FeaturedProductsList/FeaturedProductsList.css
.featured-product-list {
  display: flex;
  flex-direction: row;
  overflow-x: scroll;
}
- Use the Products page in the App file:
import './App.css'
import { ProductList } from './pages/ProductsList/ProductsList'

function App() {

 return (
   <>
    <ProductList></ProductList>
   </>
 )
}

export default App;
- Update App.css default CSS:
Update only the root CSS
#root {
  max-width: 1280px;
  padding: 2rem;
  height: 100vh;
}
- Update port in the package.json:
"scripts": {
   "dev": "vite --port 3000",
   "build": "tsc -b && vite build",
   "lint": "eslint .",
   "preview": "vite preview --port 3000"
 },
Step 4: Configure Module Federation
Update vite.config.ts
import { defineConfig } from 'vite'
import react from '@vitejs/plugin-react'
import { federation } from '@module-federation/vite'
import { dependencies } from './package.json'

// https://vite.dev/config/
export default defineConfig({
  plugins: [
    federation({
      filename: 'remoteEntry.js',
      name: 'products',
      exposes: {
        './FeaturedProductsList':
          './src/components/FeaturedProductsList/FeaturedProductsList.tsx',
      },
      remotes: {},
      shared: {
        react: {
          singleton: true,
          requiredVersion: dependencies.react,
        },
      },
    }),
    react(),
  ],
})
filename: "remoteEntry.js": Specifies the entry file for the microfrontend, which other applications can access.name: "products": Defines the unique identifier for this microfrontend.- This allows other microfrontends (hosts) to import the FeaturedProductsList component.
"./featured-products": This is how the module will be imported remotely."./src/components/FeaturedProductsList/FeaturedProductsList.tsx": The actual file that gets exposed.
Setting Up the Host Application
Step 1: Create the Host Project
npm create vite@latest
- Enter project name:
host - Select
React - Select
TypeScript
Step 2: Install Module Federation Plugin
cd host
npm install @module-federation/vite
Step 3: Implement Home Page
- Create Home Page:
Create pages/home/Home.tsx
import React, { Suspense } from "react";

const FeaturedProducts = React.lazy(
   // @ts-ignore
   async () => import('products/FeaturedProductsList'),
);

const Home = () => {
 return (
   <div>
     <h2>Home</h2>
     <Suspense fallback="loading...">
       <FeaturedProducts />
     </Suspense>
   </div>
 );
};

export default Home;
Imported Featured Products from Products (Remote app)
- Update
App.tsx
import "./App.css";
import Home from "./pages/home/Home";

function App() {
 return <Home></Home>;
}

export default App;
- Update
App.cssdefaultCSS:
Update only the root CSS
#root {
  max-width: 1280px;
  padding: 2rem;
  height: 100vh;
}
Step 4: Configure Module Federation
Update vite.config.ts
import { federation } from '@module-federation/vite'
import { defineConfig } from 'vite'
import react from '@vitejs/plugin-react'
import { dependencies } from './package.json'

// https://vite.dev/config/
export default defineConfig({
  build: {
    target: 'esnext',
    minify: false,
  },
  plugins: [
    federation({
      name: 'app',
      remotes: {
        products: {
          type: 'module',
          name: 'products',
          entry: 'http://localhost:3000/remoteEntry.js',
          entryGlobalName: 'remote',
          shareScope: 'default',
        },
      },
      filename: 'remoteEntry.js',
      shared: {
        react: {
          singleton: true,
          requiredVersion: dependencies.react,
        },
      },
    }),
    react(),
  ],
})
remotes: Specifies the remote applications (microfrontends) that will be loaded dynamically.products: The key that identifies the remote application.type: 'module': Indicates that the remote entry is an ES module.name: 'products': The unique name of the remote application.entry: 'http://localhost:3000/remoteEntry.js': The remote entry file URL where the microfrontend is hosted.entryGlobalName: 'remote': Specifies a global namespace for the remote module.shareScope: 'default': Ensures dependency sharing across microfrontends.shared: Specifies shared dependencies across microfrontends to avoid duplicate React versions.
Final Steps: Run Both Applications
Run the Remote App (Products)
cd products
npm run dev
On http://localhost:3000/, you can see the featured products and a list of all products.
Run the Host App
cd host
npm run dev
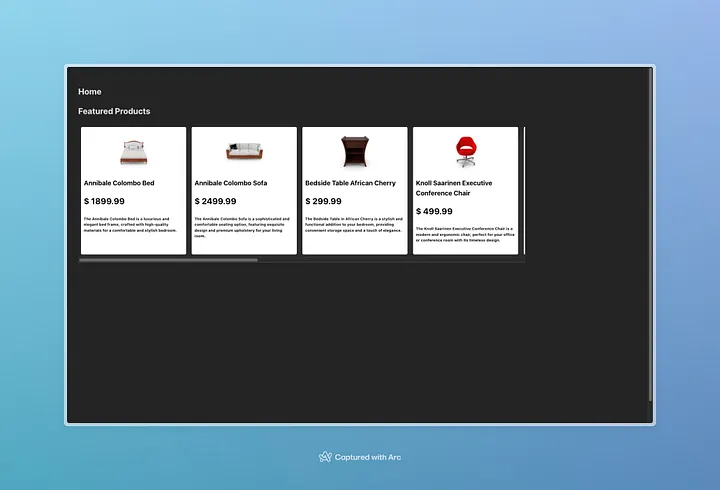
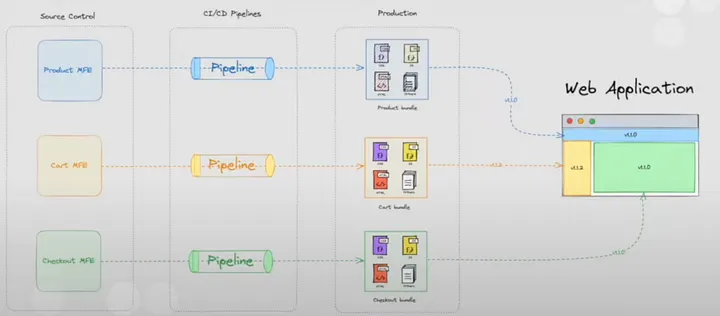
Now, the Host Application dynamically loads the Featured Products Component from the Products Micro-Frontend using Vite module federation.
And this is my example repo on GitHub, micro-frontend-demo. I will upload all of the micro frontends here.
Follow me on GitHub: MadhushaPrasad